Copyright © 2014 Hao Li

CSCI 420: Exercise 2 [Computer Graphics FS 2017]

Administrative
Overview
In this assignment, you will use Catmull-Rom splines along with OpenGL lighting and texture mapping to create a roller coaster simulation. The simulation will run in a first-person view, allowing the user to "ride" the coaster in an immersive environment. As with the previous assignment, you will create an interesting animation after finishing the program itself. This time, the objective of your animation is to show off both your coaster and the features of your program.
Lecture URL
Exercises / Q&A
Tips
Motivation
Now that the first programming assignment has familiarized you with working in OpenGL, this assignment asks you to utilize some more interesting features of the library in the design of a more significant and more entertaining application. In addition, this project gives you a great deal more freedom to be creative in the actual design of your program and the features that go into it; you are asked to create your own solutions to issues involved in the making of your simulation, and to render your coaster as you wish in a world of your design.
After completing this assignment, you should have a solid understanding of:
-
•Splines
-
•Texture maps and their use in OpenGL
-
•Camera manipulations--the use of transformations to create realistic first-person movement
This assignment should be challenging, at least as much as the first assignment and likely more. However, it should also be a lot of fun! Please start early.
Background
Your Implementation
Starter code: You can find the starter code and supplementary files here: [Visual Studio 2017], [Mac], [Linux]. The Mac and Linux starter codes require the "pic" image library. If you already compiled "pic" in the first assignment, you don't need to download and recompile "pic" again. As a reminder, the "pic" directory has to be located one level above your assignment 2 directory (e.g. if assign2 == /home/MyComputer/assign2, then pic must be in /home/MyComputer/pic). For those who are working on Mac or Linux for the first time, get "pic" [here].
Level 1 (spline): First, please implement your spline function and draw some splines to the screen. A point on a single Catmull-Rom spline segment is given by:
p(u) = [u^3 u^2 u 1] M C, (1)
where M is the Catmull-Rom spline basis matrix, C is the control matrix, and parameter u varies on the interval [0,1]. The exact form for M is given in the lecture notes, and also in Angel, p. 629 (for s=1/2). Note, however, that there is a typo in the formula in Angel: The last entry of the first row of M should be 1 instead of 0 (i.e. the first row of M should be [-1 3 -3 1] instead of [-1 3 -3 0]). Also, please do not forget to include the 1/2 factor before the matrix if you are using the formula in Angel.
Please consult the spline lecture notes (slide "How to Draw Spline Curves") for how to render a spline. You may use the simplest, "brute-force" method where you vary the parameter u by some fixed value, for example 0.001. Insert each value of u into equation (1) (above), to obtain the point location p(u). For example: u = 0.0, 0.001, 0.002, ..., 0.999, 1.0. Then, connect consecutive points with lines, for example, by using GL_LINES. You may need to set a proper line width, by using the OpenGL glLineWidth function. Note that in order to see the spline, you must setup your OpenGL camera. For a start, you can just use a stationary camera, similar to the first assignment (we recommend using gluPerspective for this assignment). You may use the keyboard/mouse to view the scene from different angles, or zoom in and out, just like in the first assignment. We provide a set of "track" files containing control points to define some simple splines, and starter code to read in a sequence of these files and convert them to sequences of control points that you can use. You can safely assume that each spline file (i.e. splines/*.sp) has at least 4 control points. You are encouraged to experiment with .sp files, creating your own spline files as needed for your personalized solution (well-documented creativity will be awarded).
Level 2 (ground): Next, add the ground. You can use a plane for the ground. It should be texture-mapped for realism with an image of your choice. There are plenty of free texture sites on the Web, for example [mayang textures], or [texture forest], (and many others, search for them on Google), so find one that appeals to you. Note that you may need to rescale your texture image to be of dimension that is a power of 2. For example, good choices are 256x256 or 512x512. You can use any software you wish to scale and/or edit your texture image.
Level 3 (sky): After this, create your sky--this should also be texture-mapped, and the method of modeling it is up to you. For example, one way to create the sky is to enclose the entire scene into a cube, and then texture-map the faces of this cube with some sky-like texture. Note, however, that there are issues (e.g., visible seams) with many obvious representations, so you can improve this for extra credit (but don't do it until you are done with all the levels). Make sure that you can still draw the splines as before once you have done levels 2 and 3!
Level 4 (the ride): Now, implement the ability to ride the coaster. You can do so by moving your camera at a constant speed (in u) along the spline (creating physically realistic motion is extra credit). Properly orienting your camera is a challenging problem! You'll want to have your camera facing "forward" (along the tangent to your spline) as it moves. The tangent vector can be computed by differentiating equation (1) with respect to u, that is: t(u) = p'(u) = [3u^2 2u 1 0] M C. Note that you need to normalize this vector to obtain a unit length tangent. Also, you need to make the "up" vector of your camera follow some continuous path of normals to the spline. A cheap method to decide your up vector is to always set it equal to the normal of your ground plane--however, this is very unrealistic for many splines. Another method is described [here].
Level 5 (rail cross-section): Modify the appearance of the coaster itself: instead of just a line, make your track look like a track, by rendering a cross-section of the rail. In order to render the cross-section, you can use the tangent, normal and binormal described in Level 4. Suppose p0 and p1 are two consecutive points along the spline. You can then compute vertices v0, v1, ..., v7, and render a tube as described in the following [PDF], and further illustrated [here]. In this example cross-section is a square, but you may change that to other shapes, such as a circle or ellipse.
![[here]](http://run.usc.edu/cs420-s14/assignments/assign2/csci480_illustration_frames.png)
After this is all done, add some fun extras! Do not attempt extra credit until you have successfully finished everything else, or else you run the risk of running out of time.
Animation Requirement
Just like with the first assignment, you are required to submit an animation, represented by a series of JPEG images which are screenshots from your program. We allow for more frames this time as your coaster may take more time to demonstrate--please name your JPEG frames 000.jpg, 001.jpg, and so on. Do not exceed 1000 frames. The frame rate for the animation, again, is 15fps.
Grading Criteria
Your program must:
-
•Complete all levels.
-
•Properly render Catmull-Rom splines to represent your track.
-
•Render a texture-mapped ground and sky.
-
•Render a rail cross-section.
-
•Move the camera at a reasonable speed in a continuous path and orientation along the coaster.
-
•Render the coaster in an interesting manner (good visibility, realism).
-
•Run at interactive frame rates (>15fps at 640x480)
-
•Be reasonably commented and written in an understandable manner--we will read your code.
-
•Be submitted along with JPEG frames for the required animation (see below).
-
•Be submitted along with a readme file documenting your program's features and describing the approaches you took to each of the open-ended problems we posed here (rendering the sky and determining coaster normals in particular). This is especially crucial if you have done something spectacular for which you wish to receive extra credit!
Submission
Please submit your code along with your JPEG images and readme to the Blackboard. After submission, please verify that your zip file has been successfully uploaded.
Tips
-
•Start this assignment as soon as you can. It is a significant endeavor, with many intermediate steps. If you wait until a few days before the assignment is due, you probably will not finish. This project is a lot of fun if you're not rushed, and if enough time is put in the end product is something fun that you can show off to your friends.
-
•Reuse any code from the previous assignment that might save you some time. OpenGL programs tend to have a fair deal of overlap. Particularly, you might want to borrow some user control functionality, functions to read/write images, and any functions you might have made to automatically write out the frames for your animation. Don't overdo this to the degree that you have an awkward time changing things for this project--the general structure of your transformations and the state of your simulation will be significantly different from the layout of the previous assignment.
-
•Do not load the texture before initializing OpenGL and GLUT (initialization happens when calling glutCreateWindow). Otherwise, there is no place to load the textures to, and textures won't work.
-
•Experiment with your own ideas, and have fun.
-
•Here are some further assignment [tips] and [more tips] (from the recitation session).
Extras
This assignment is much more open-ended as to what you may choose to implement for extra credit. You may be awarded credit for any creative or interesting solution to an issue in your implementation, as long as it is well-documented in your readme file. Below are some ideas you might want to think about if you have the time:
-
•Render a T-shaped rail cross-section.
-
•Render double rail (like in real railroad tracks).
-
•Make your track circular and close it with C1 continuity (small credit, i.e., 1 point).
-
•Add OpenGL lighting to make your coaster look more realistic.
-
•Draw additional scene elements: texture-mapped wooden crossbars, a support structure that looks realistic, decorations on your track, something interesting in the world nearby, etc.
-
•Create tracks that mimic real world roller coasters such as [Magic Mountain] (close to Los Angeles; check out the Green Lantern in the [video]), or [Gardaland] in Italy.
-
•Generate your track from several different sequences of splines (multiple track files), so you can shuffle these around and create a random track.
-
•Draw splines using recursive subdivision (vary step size to draw short lines) instead of using brute force (vary u with fixed step size).
-
•Render the environment in a better (prettier, more efficient, more interesting, etc?) manner than described here.
-
•Decide coaster normals in a better manner than described here.
-
•Modify the velocity with which your camera moves to make it physically realistic in terms of gravity. Please see the [equation] on how to update u for every time step.
-
•Derive the steps that lead to the physically realistic equation of updating the u (i.e. u_new = u_old + (dt)(sqrt(2gh)/mag(dp/du)), see [here]).
![[Gardaland]](http://www.viaggiestate.com/wp-content/uploads/2010/06/gardaland-bluevertigo.jpg)
Please note that the amount of extra credit awarded will not exceed 20% of this assignment's total value.
Simulating a Roller Coaster
In order to create the track for your roller coaster, you'll need to render a spline sequence which represents the entire length of your track. In order to do so, you will need to implement a function that takes four control points (p0 through p3) and a floating point value (u) from 0 to 1, and computes the corresponding position on the spline segment defined by these four control points. Drawing a single spline from four control points isn't that exciting--you'll need to use several control points in sequence and draw spline segments along them, starting from the first four points and proceeding until you draw the final spline for the last four points. This will allow you to represent a long, elaborate curve for your coaster.
We'll be using Catmull-Rom splines for the representation of your coaster. These were defined along with their geometric constraints in lecture, so please see the corresponding slides for information.
DUE MONDAY OCT 23RD 2017 BY 11:59 PM
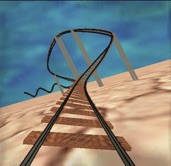
An example of a solution, with several extra credit elements (for example, the support structure, double rail, and the textured-mapped crossbars). Of course, this is just an example; your solution will likely differ. This image is not a standard for grading or meant to show what you need to do. The text on this webpage gives the official (and only) rules for the assignment requirements.